Airstream Interstate Macerator Pump Ugggg!
What the h#!! is a macerator pump? Well, according to good old Wikipedia it’s “Maceration, in sewage treatment, is the use of a machine that reduces solids to small pieces in order to deal with rags and other solid waste. Macerating toilets use a grinding or blending mechanism to reduce human waste to a slurry, which can then be moved by pumping.” Ugggg, how’s that sound to ya? Unfortunately for us (me), we got up close and personal with our Airstream macerator pump in less than a week into our full-time trip in our 2014 Airstream Interstate RV.
After leaving Minnesota in January, we made it down to North Texas in two days to de winterize our rig at our first Thousand Trails campsite. While emptying out our black and grey tanks with our macerator pump I noticed a steady stream of liquid coming from underneath the van. “Oh sh!t “, I yelled out loud. Thankfully, we hadn’t used our toilet at all for number two so it wasn’t a complete and massive biological waste spill needing full hazmat suits.
Is This a Sign?
Every type of worst case scenario ran through my head. Where is it coming from? Are we going to have to bring our home into a repair shop? How much is this going to cost us? But, then my common sense came steaming back and let me remember that most leaks are an easy fix…a loose clamp, a gasket, or a seal needing replacement………… right? Well, off to the internet for hours of research to figure out what’s going on. I know I can fix pretty much anything as long as I can get to it and get a little help from others that have been there before. I wanted to share my experience, knowledge, and what I used to turn this major disaster into just another small bump in the road. Character builder!
First Step – Inspection
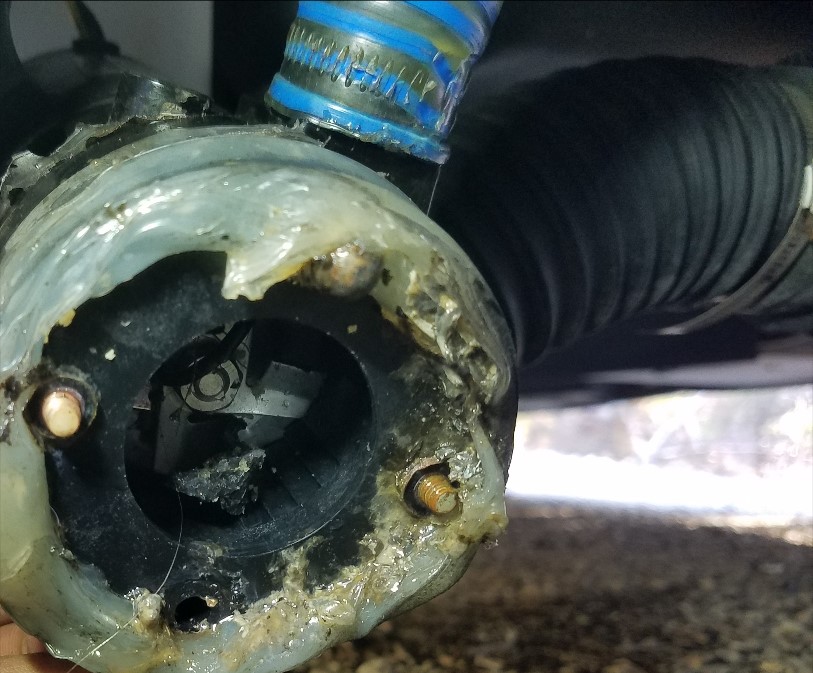
Get up close and personal with your macerator pump and find the source of the problem. I quickly realized the leak was coming directly from the body of the pump after thoroughly inspecting the input and output hoses leading into the macerator pump. If it’s not leaking at those two hose points check around the body between the metal motor base and the plastic housing. I found out later this is a common leak point, hence why they sell a repair kit. My macerator pump still worked and discharged fluid out, but it was leaking pretty bad, meaning we really could not use our black or grey waste tanks until we fixed this mess.
Second Step – Pump or Kit
Decide which route is best for your situation. I was hoping to find a loose rubber gasket or o-ring as a quick easy fix, but the deeper I got into the disassembly I soon realized it was probably going to need a whole new pump. There is a repair kit they make for these pumps that I probably would have tried to save $70 bucks, but I didn’t want to take any chances and felt it was the less stressful route to just replace the whole thing. If you are on the road, this isn’t really a situation you want to try and save a few bucks, but it’s an option.
Repair Kit Option
The repair kit comes with the body, impeller, 2 gaskets and seal. Another common problem is the broken brass studs that hold the plastic body onto the pump. Two of mine were broken so I would have also needed to buy the stud kit. Like I said, I would have probably went this route to save money if I wasn’t pressed for time and sanity to get this fixed. Although, it was really nice to have the new pump come all assembled which made it a quick and easy install. Also note the stainless steel bolt kit – 17288-1000 – must be purchased separately with the repair kit for macerators January 2015 and onwards according to Amazon.
On that note, I did include affiliate links for the pump that I used (and recommend) and also the repair kit and bolts that I might have ordered if I had time and a comfortable place to work on it. I do receive a small commission from Amazon (doesn’t change your price) on anything purchased though the links. My wife and I recently quit our meat grinder jobs to embrace the pace of life on the road in our RV and are trying to carve out a little piece of our version of the American Dream! We started our own online fitness and nutrition coaching business that she is the trainer and I run the website. We will also be documenting our travels and experiences helping to supplement our income by writing reviews and recommending products that we use and believe in.
Whole Replacement Pump Bolt Kit Repair Kit Only
Disassembly and Replacement – Airstream Macerator Pump
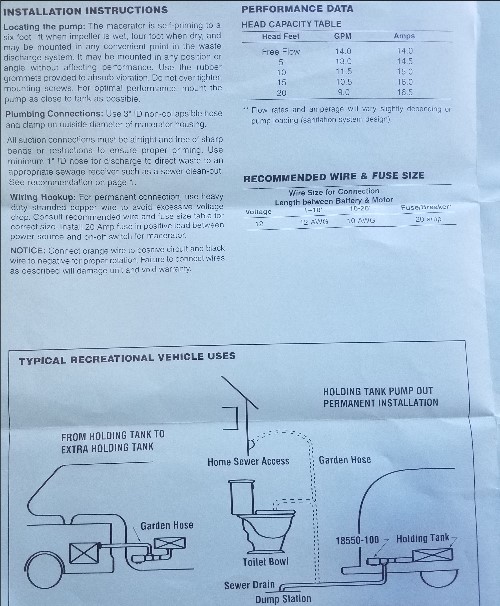
Disassembly of the Airstream macerator pump is not as intimidating as you might think looking at it. Worst part is lying on your back under a 15k pound vehicle with about 8 inches of clearance. Start by removing the hose clamps from the large 3 inch input hose and small 1 inch discharge hose with flat head screwdriver or hex nut (5/16 or 3/8 I think). Airstream uses a ton of silicone on the large hose during assemble, so it takes quite a bit of wrenching and twisting back and forth to remove.
But, it was actually the smaller hose that gave me the most trouble. I could twist it, so I knew it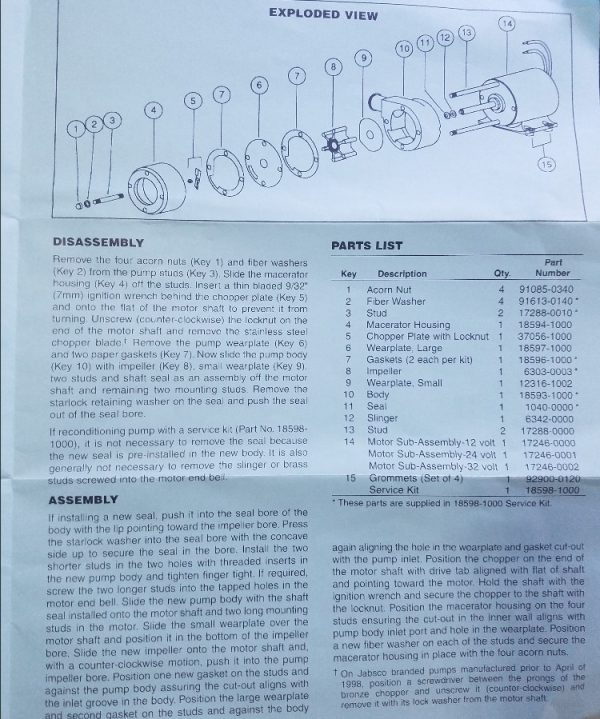 was free, but it just would not inch backwards off like most hoses. It is a very hard plastic hose and there is a large lip on the pump input barb. I ended up removing it last when the whole pump was disconnected and could get my best leverage to just use brut force to pull it off.
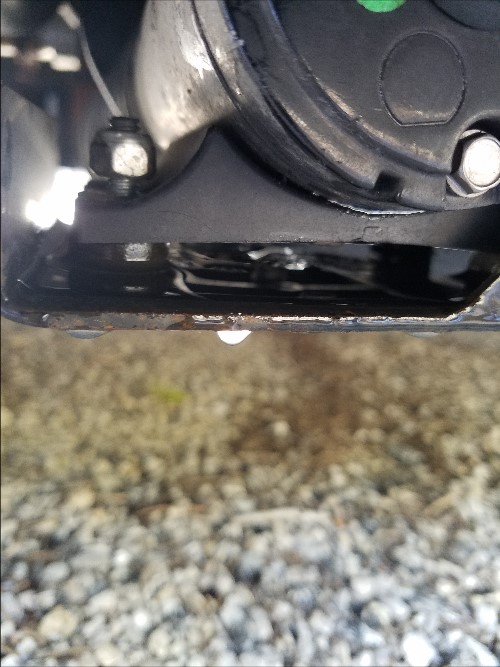
Next there are 4 nuts holding the pump onto a base plate that is attached to the vehicle. Remove the nuts and washers with a small ratchet and extension for the back bolts. The size I believe is a 10mm or 11mm socket. Last are the 12v power and ground wires connecting to the pump.
After safely disconnecting all power to the coach (always test!) you can cut the power and ground wires just above the original butt connectors. You will use 12g (blue) butt connectors to reconnect the new pump when ready. Assembly is basically just the reverse of taking it out. Once everything was out it took me about 20 minutes to install the new complete macerator pump. Really, all in all, it’s not that bad. This is something most average handy folks can do in a single day and save yourself probably $500 or more. 2 clamps/hoses, 4 nuts and two wires are all that separate you from all the macerating fun you can handle.
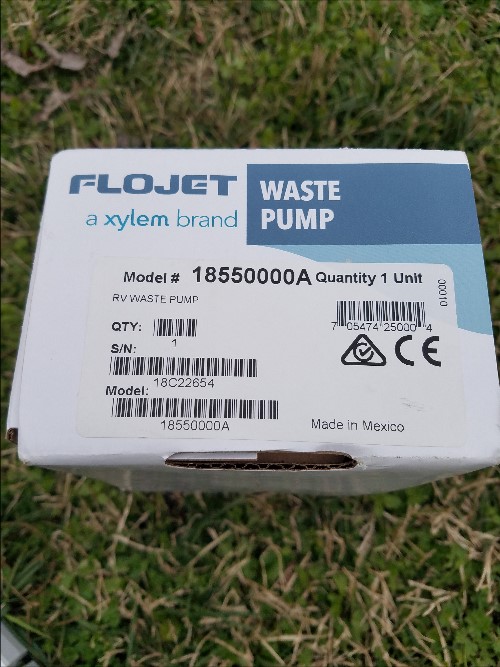
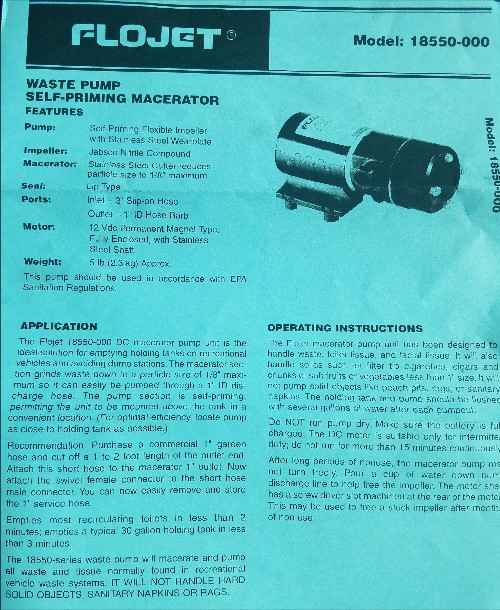
See pictures below of my original Flojet pump part number 18550-300c, which is the same as Flojet 18550-000A from Amazon. The repair kit for the pump (18598-1000) fits multiple pumps from Flojet and Jabasco, including 18555-000, 18550-000 18590-2092, 18590-2094, 18690-0000. Hopefully this post will help someone out in the same situation we just found ourselves in. If you have any questions feel free to leave them in the comments below and I will respond back as soon as I can. Thanks!
Check out my other reviews on YouTube!


Aa Ron…..ha! That is awesome! Not the plumbing prob, but the name. Classic.
Gotta smile at this crazy life!
Thank you so much. This was worth it
Took 2-1/2 hrs moving slow with full black tank because I had put it off
Our pump failed after 4 years blowing fuses means your own borrowed time!
Not only did our macerator pump go out, and the bolt housing broke off, but the large hose to the macerator is leaking. We have a replacement pump, but cannot find anything to replace the hose, other than a $75 a foot piece of hose from an r.v. dealer. Any thoughts where we can find another, more affordable hose option?
not sure if you found the hose, but i purchased from Woodland Airstream, and yes it was $76 plus $20 to ship. Unfortunately there was no other options.