SumoSprings Installation and Review
This is my step-by-step (with pictures and tips) SumoSprings installation and review for the front and rear on my 2014 Airstream Interstate on the Mercedes Sprinter 3500 chassis. I’m going to start out with the installation process so if you’re here only for my review skip down below. This was actually the very first upgrade I bought for our Airstream because of how much of a difference I read they can make. Make sure you read all the way to the end for a tip that could save you hours of wrestling with the rear SumoSprings!
It took about 3 months for me to install them since we left Minnesota in the winter time and I didn’t have proper space to do it. Honestly, it was a little intimidating. I hate working underneath big vehicles! But, I want to put this information out there as it was a pretty easy process and it can totally save you up to $500 on the install. By month 2 of hauling around the box in our space deficient van, I was actually going to pay someone to put them in.
I knew it wasn’t that hard and a good shop should be able to put them in quick. I thought maybe $100-$200 max. Well after my seventh call around I knew this was going to be an issue. As I explained what I was looking to get done, most wouldn’t even do the work and referred me to heavy-duty shops or places that work on motor homes. As easy as this is, not many places know what it is.
If this is something you don’t feel comfortable doing I recommend going to Camping World, as they actually knew what it was and would only charge about 1 hour per set to do it. Maybe, $300 or so for the front and rear. The catch……… Camping Worlds service is usually booked out weeks, if not months in advance so plan ahead or read on to get a good idea of what this job takes.
The Disclaimer
This is not professional advise on how to install these SumoSprings. I was in the automotive field for 18 years but I am not a mechanic, just a DIY’er that uses the help of others and information online to figure things out. This is the step-by-step process on how I installed them on my vehicle. I want everyone to be safe out there and use common sense while working on these big rigs! We all have different skill levels and that’s what is so great about the internet and finding information on what we have never done before.
Second Disclaimer
My wife and I recently quit our meat grinder corporate jobs and started an online fitness and nutrition coaching business. To help supplement income we write blogs on products that we use and recommend. As an Amazon Associate I earn from qualifying purchases that you make through our affiliate links. This does not change the price you pay and it helps support this blog. Hopefully you find this information helpful and feel free to ask me any questions in the comments I will do my best to answer them. Thank you!
Front SumoSprings Installation Overview and Tools
2014 Airstream Interstate on 2013 Mercedes Sprinter 3500
Ok, now let’s get to it. On a difficulty scale of 1 (easy breezy) to 10 (holy hard), I found the fronts to be amazingly easy. 1 all the way. You don’t have to work under the vehicle on your back, you don’t have to take off the wheel, and it’s super straight forward allowing you to do it in about 30 minutes. This included me stopping multiple times to take photos and dictating steps to my wife to get an accurate and detailed description of this job. After doing the passenger side, the driver side honestly took me about 5 minutes. If I knew they were this easy, I would have installed them the day after I bought them on the side of the street in the frigid Minnesota winter. Well, maybe not, but that’s how easy the fronts are.
TIP – Before lifting the van, if possible reduce the overall weight by emptying fresh/grey/black tanks and removing other large heavy items. Water weighs roughly 8 pounds per gallon so on my rig that’s about 600lbs of weight if full. We also carry 75lb adjustable dumbbells so I removed them too. Just something to keep in mind.
Tools I Used
• Factory Sprinter bottle jack
• 3/8 ratchet (Front)
• 4” extension (Front)
• 13 mm deep well socket (Front)
• Magnet pickup tool (not required but helpful)
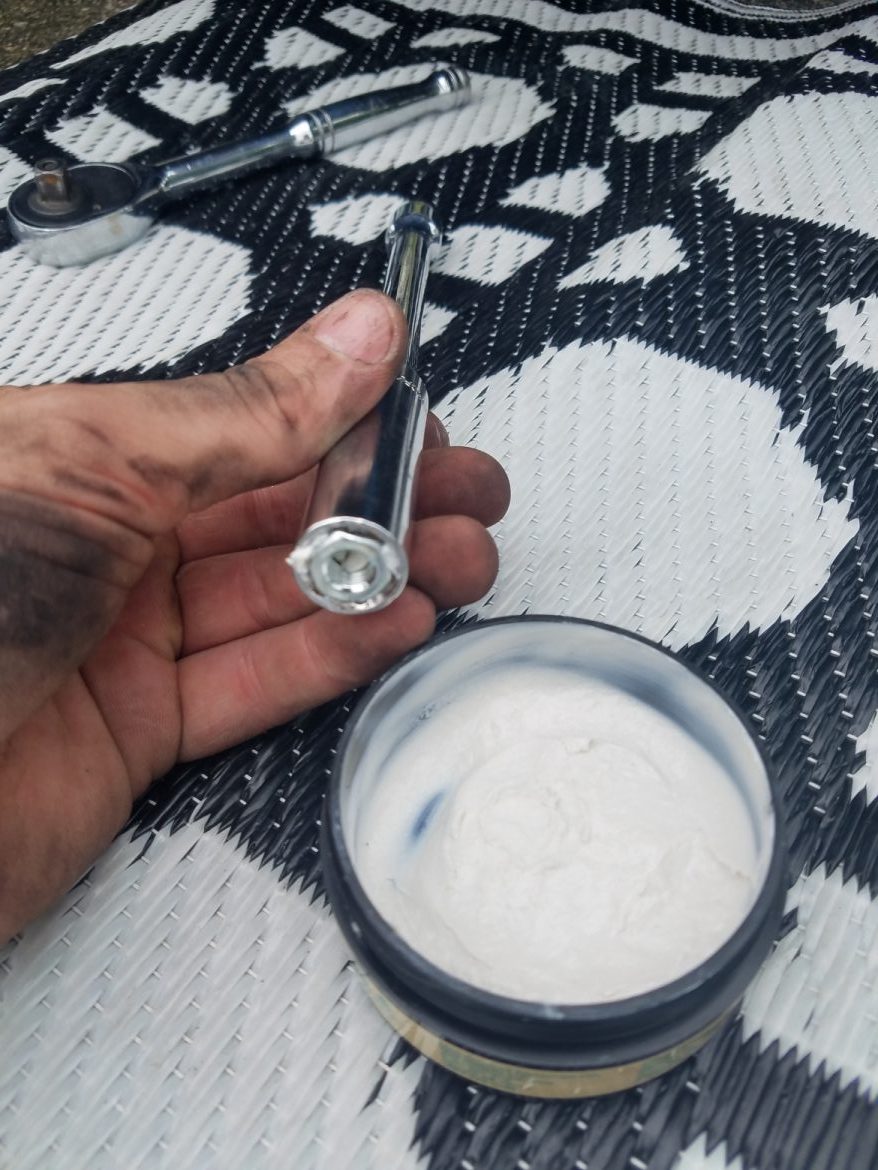
• “Sticky Lube” All I had in the van was Hair Gel – (*not the “something about mary” kind!) *My wife added this little joke as I was dictating notes to her. She thought it was pretty funny……….. Leave a comment down below and let her know if you think so too.
• Lubricant for rear SumoSpring (WD-40 or similar)
• Variety of flat head screwdrivers (Rear)
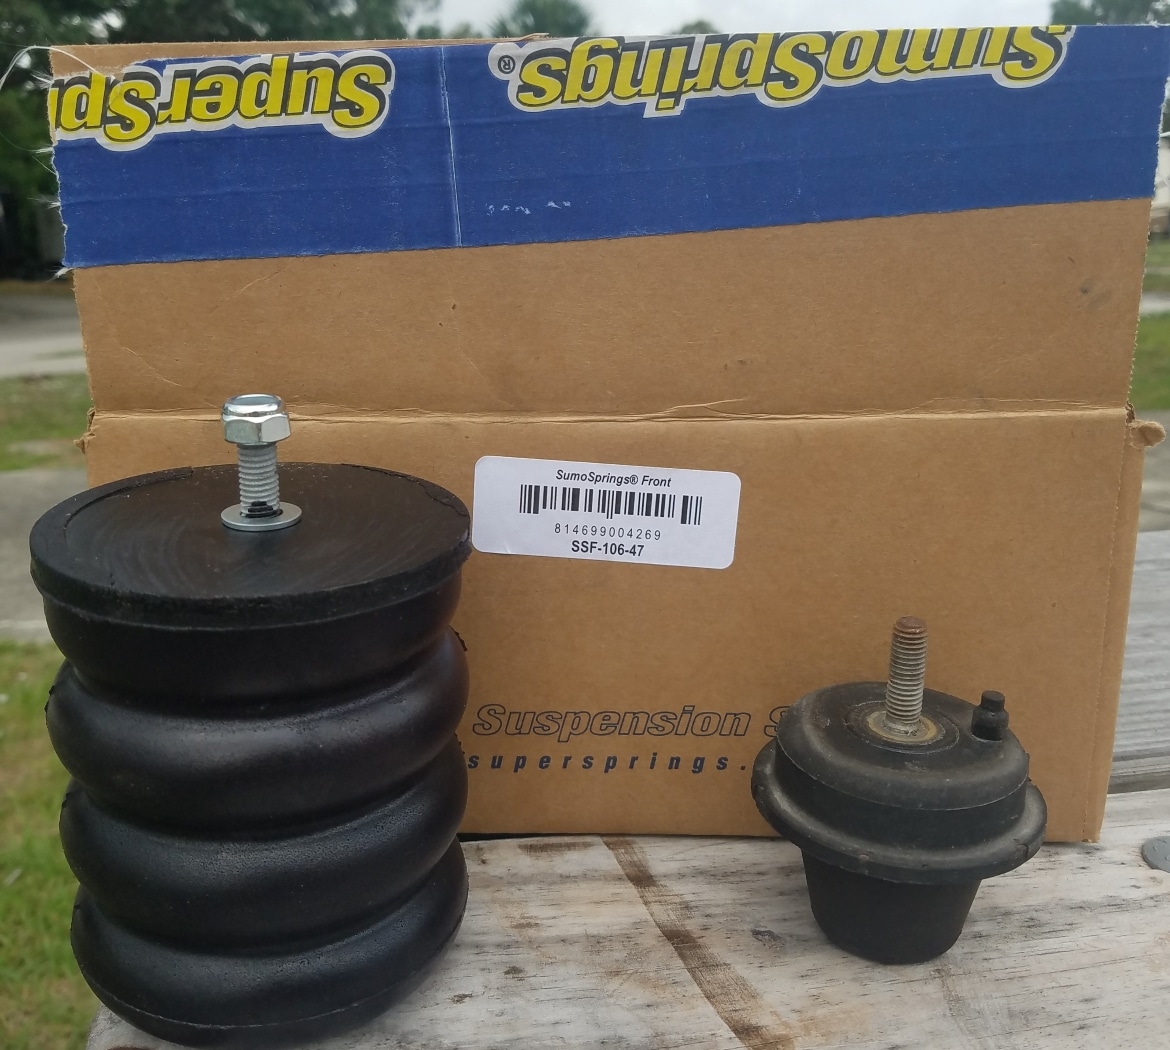
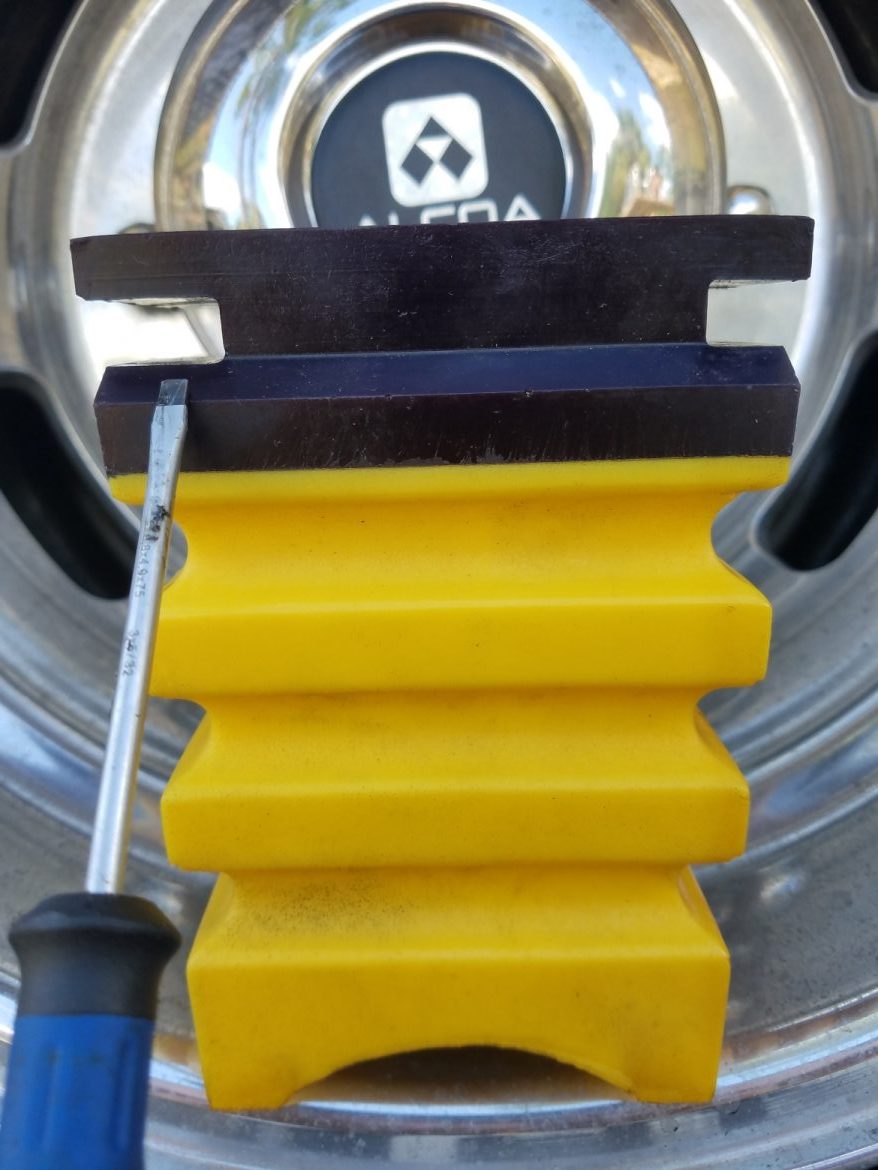
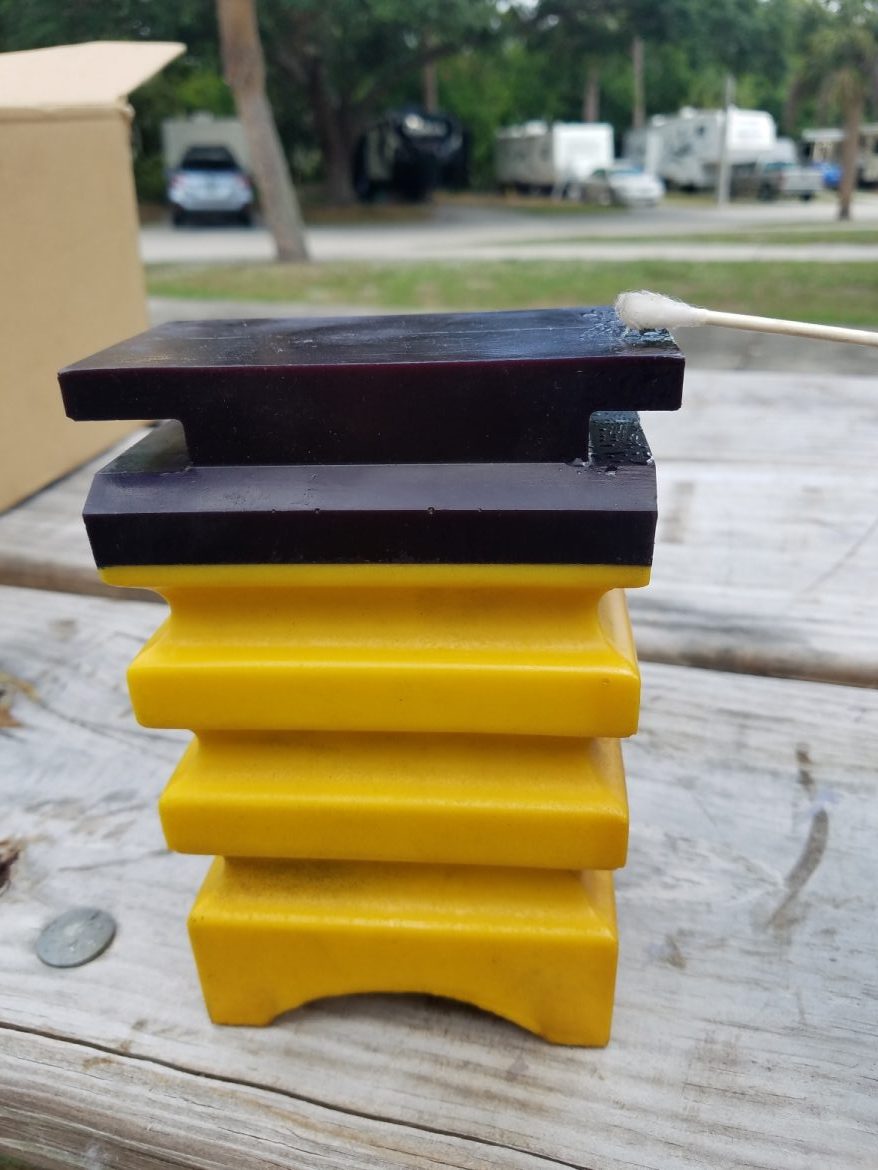
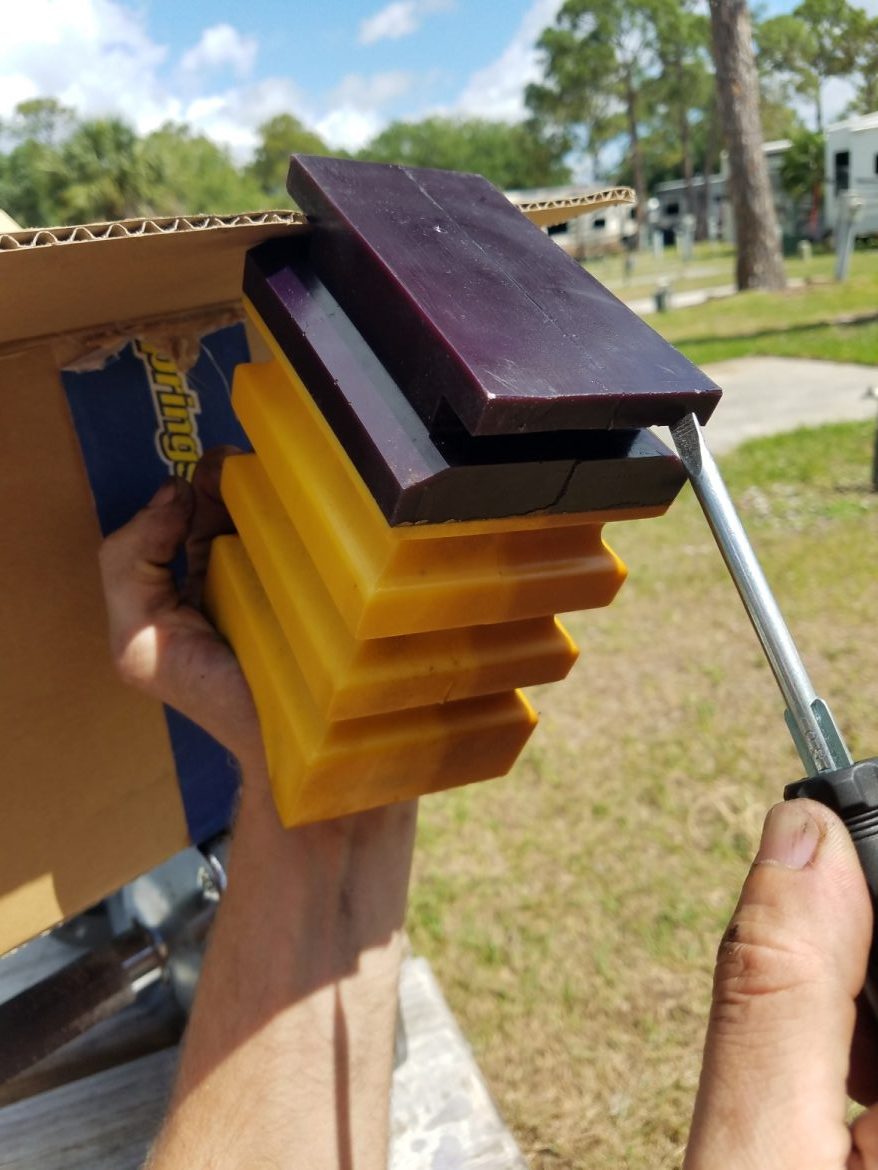
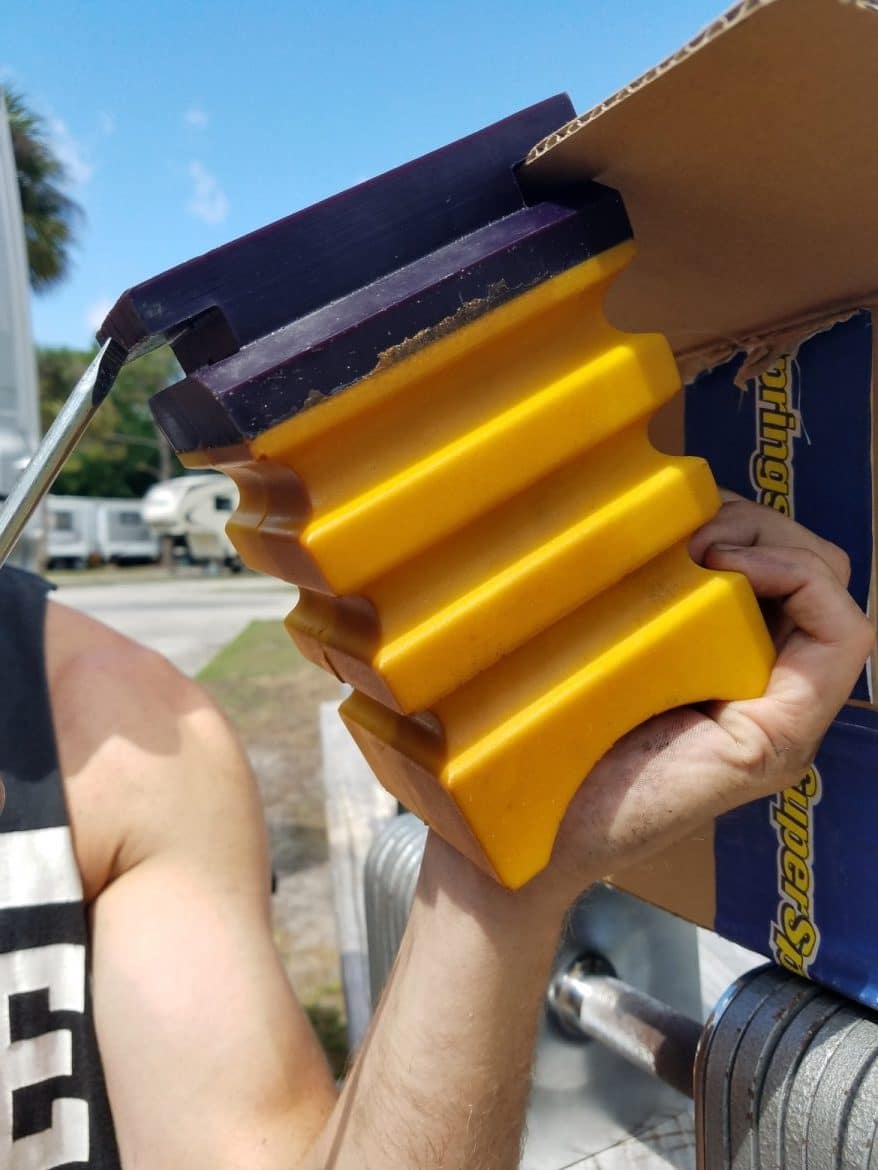
SumoSprings I used SumoSprings Medium and Light Options
Fronts SSF-106-47 Rears SSR-338-54 Rear Medium -47 Front Light -40
Front SumoSprings Installation Steps
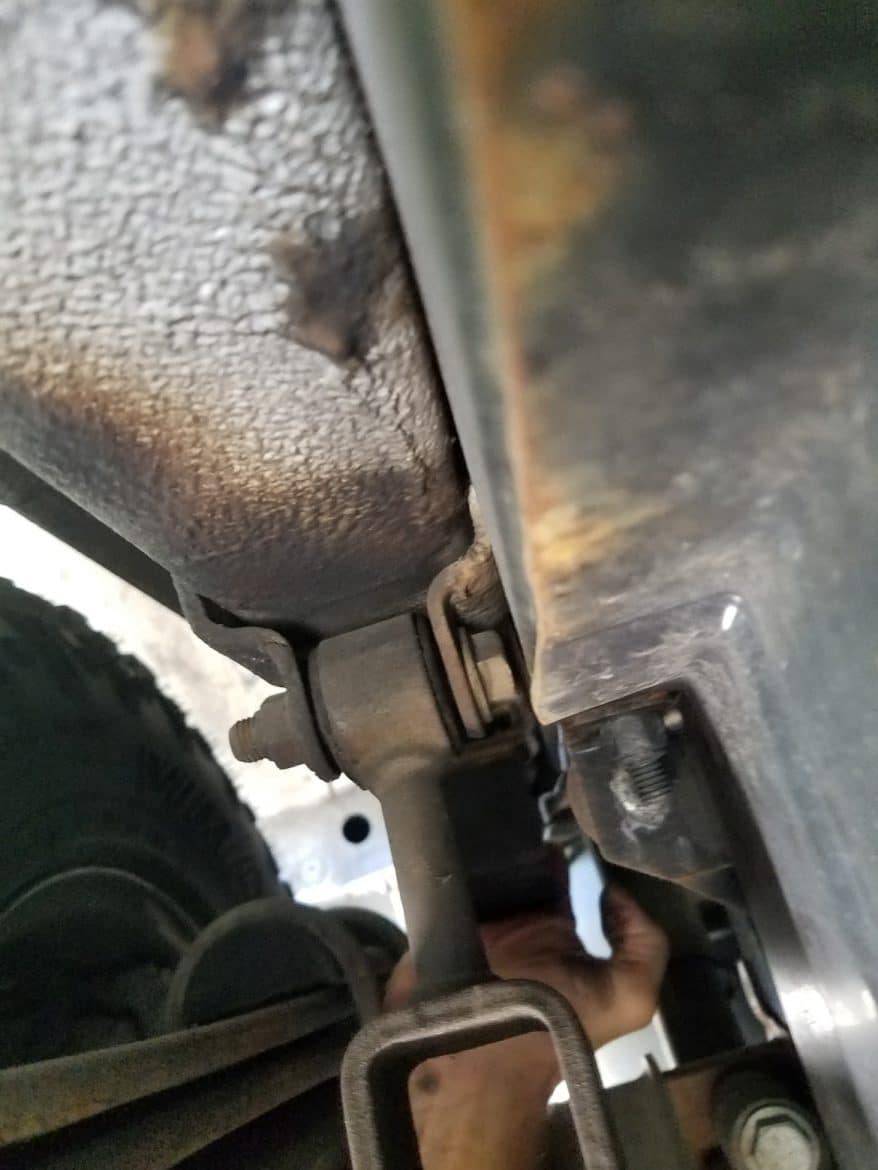
Tip – Before starting the job turn replacement side wheel out. This will give access to the factory bump stop without going under the vehicle. Do not jack up the vehicle yet.

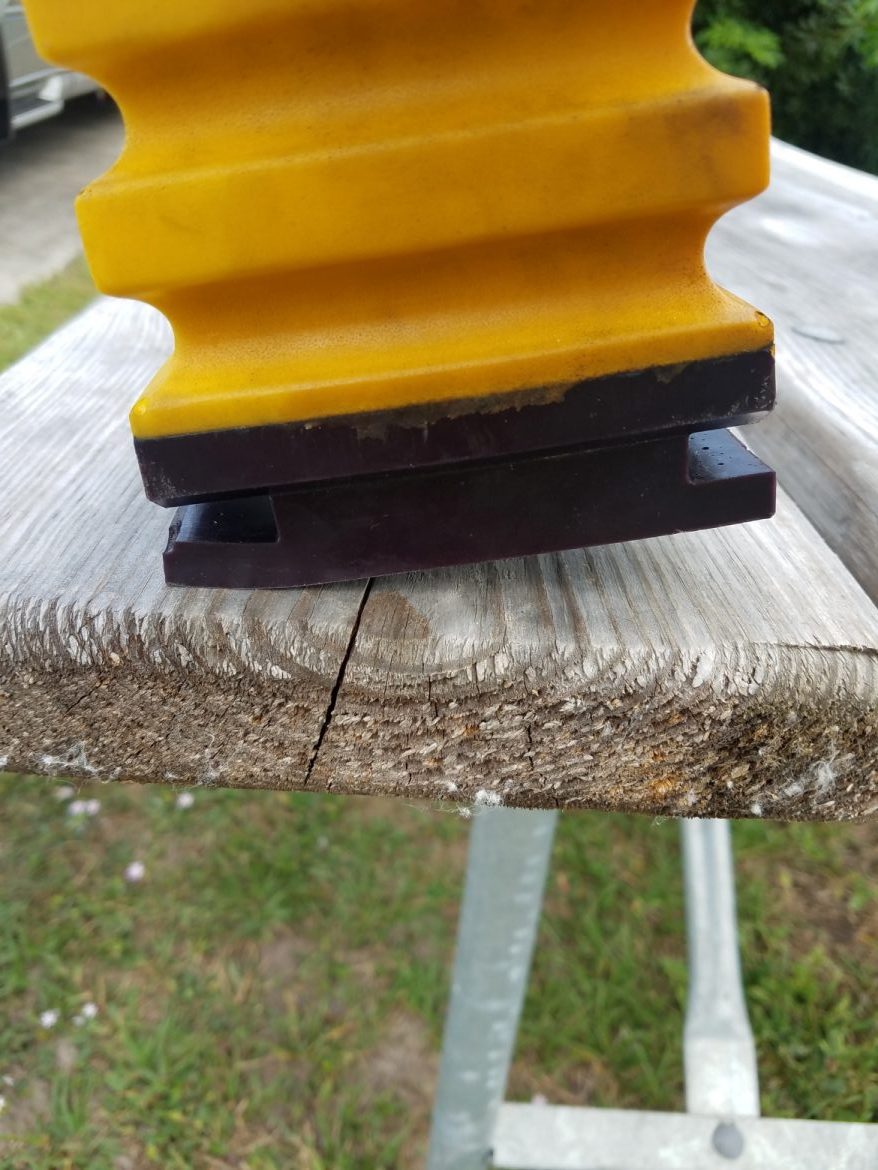
Step 1 – Remove Original Bump Stop
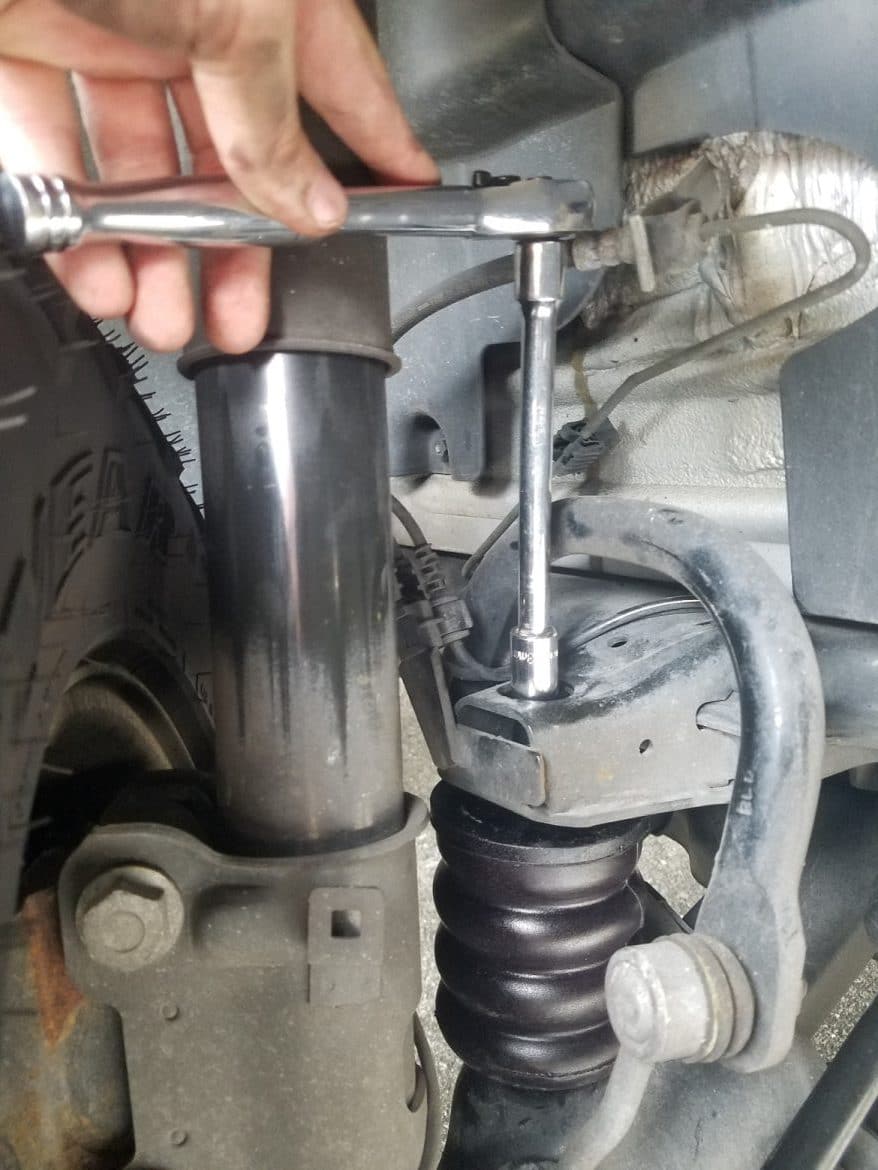
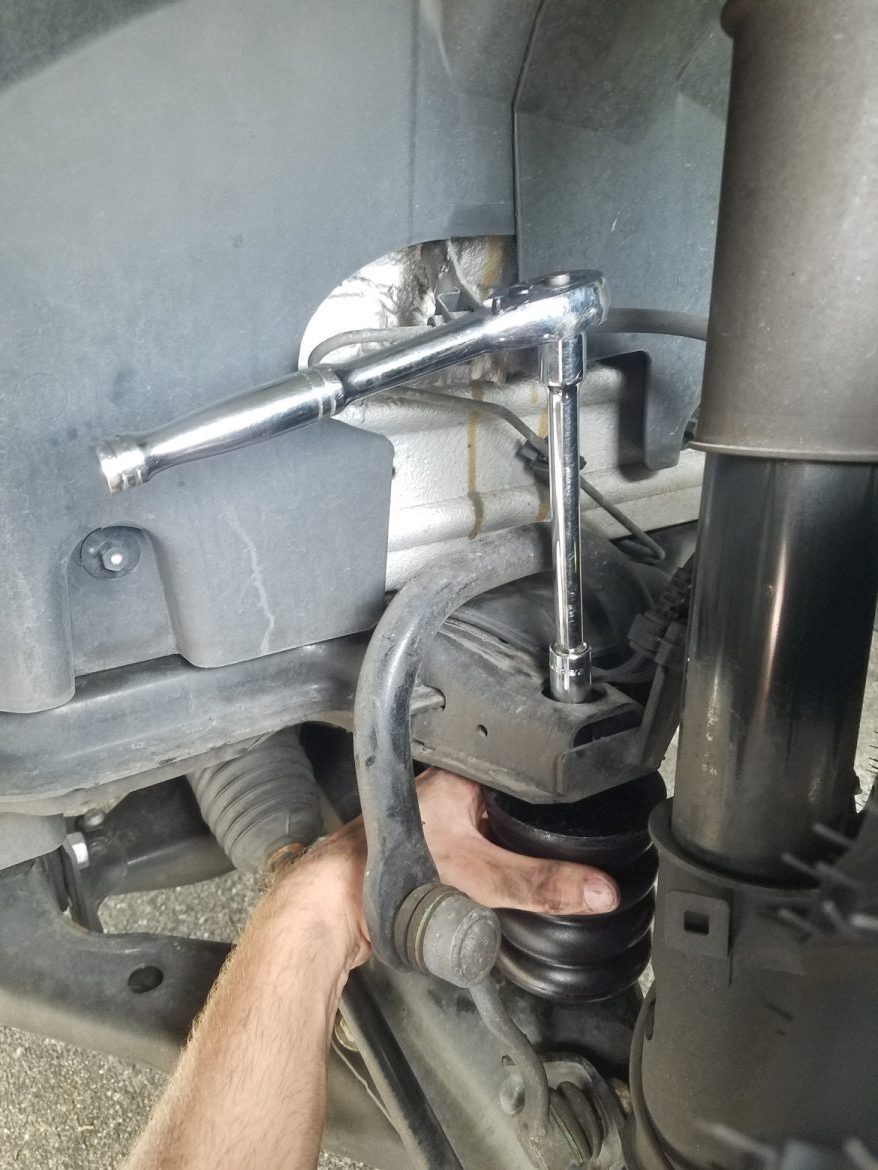
Access the nut through the top of the cross member, down the access hole. Using ratchet, extension and 13mm socket un-thread nut and remove original bump stop from below. The nut will fall into the top hole where the magnet pickup tool will be helpful.

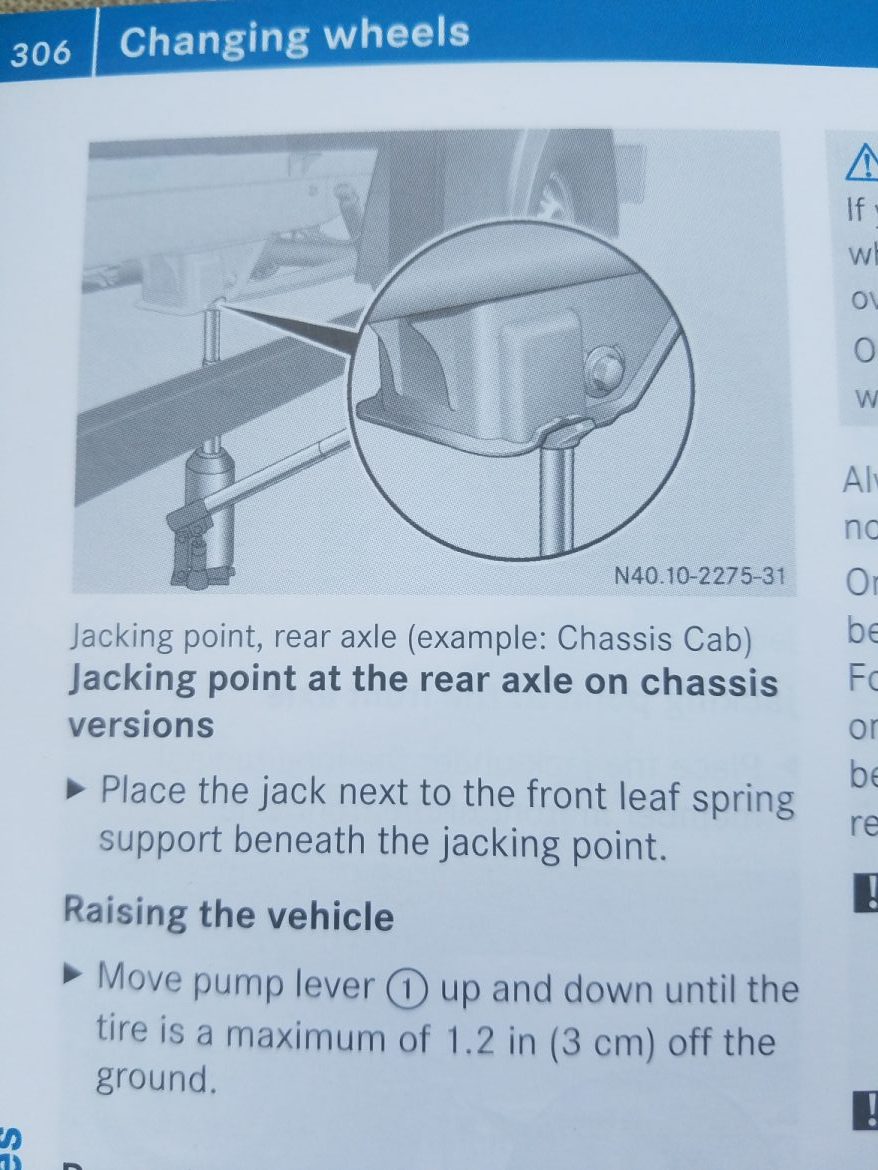
Step 2 – Locate Front Jacking Point
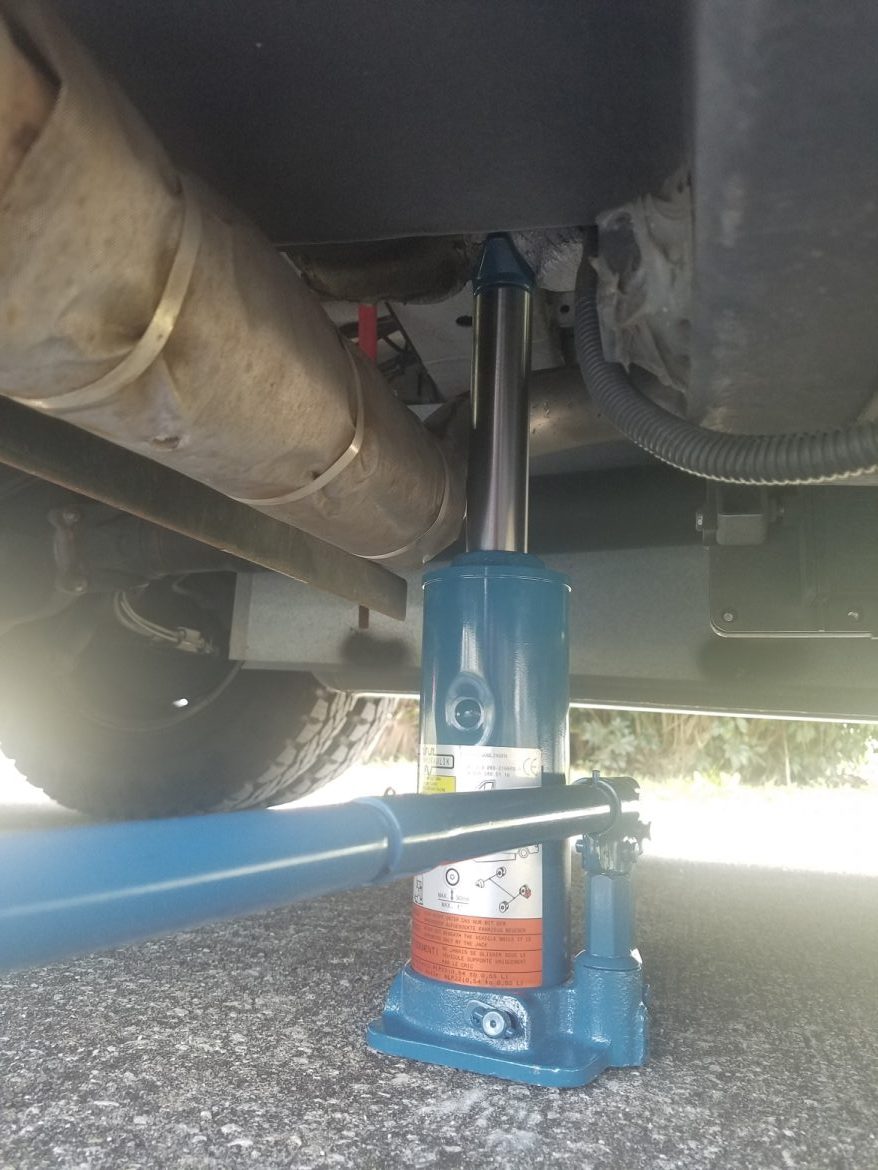
Locate front jacking point via your manufactures recommendation. Should be in the owner’s manual along with other safety information you should read about your vehicle. Most OEM jacks have a specific cradle that mates with the under carriage at a safe point for lifting the vehicle without damaging it. I could have used a floor jack for the front, but there would have been no way to get to the rear access point so I liked that Mercedes Sprinter includes a nice German 7,000lb bottle jack to use.


Step 3 – Lift Vehicle Suspension to Allow Room For SumoSpring
I Only lifted the van suspension a couple of inches. The front tire will not even need to come off the ground and only go high enough to squeeze the new sumo spring in.

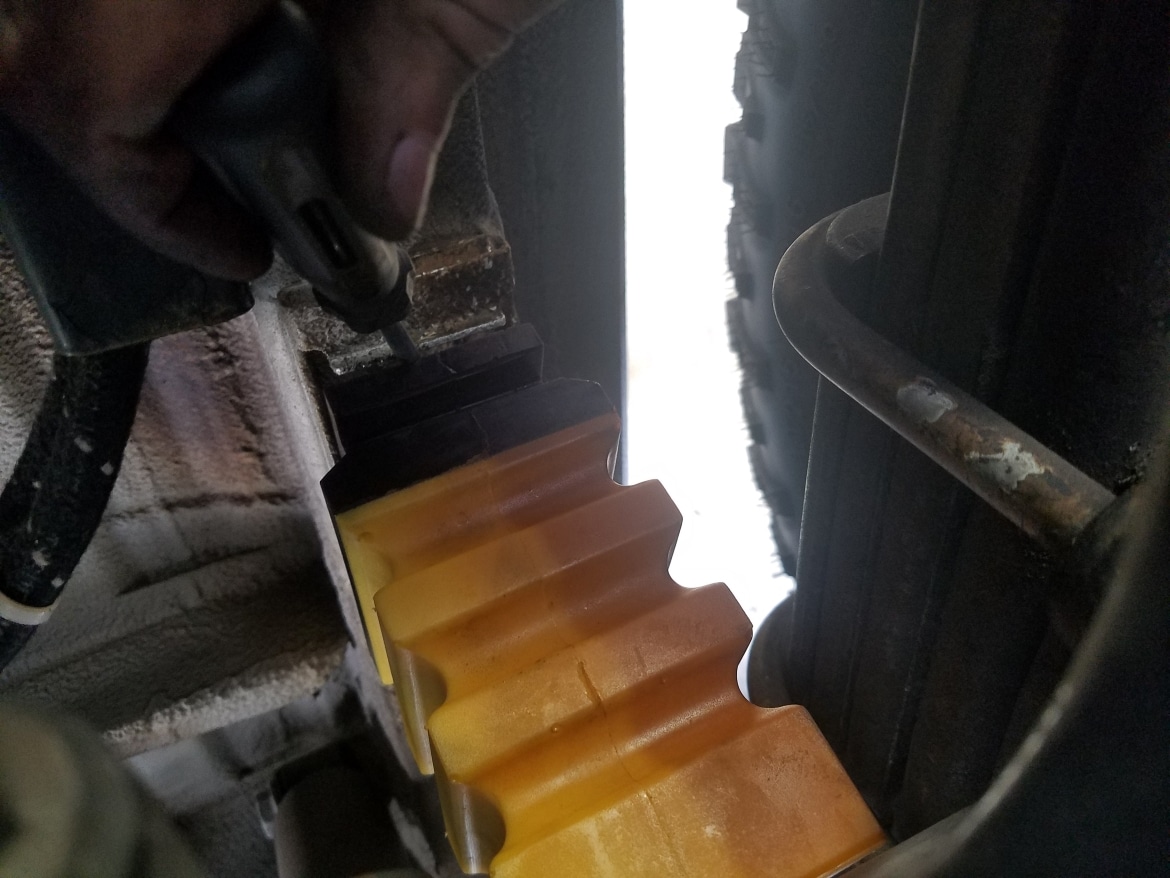
Step 4 – Install New SumoSpring
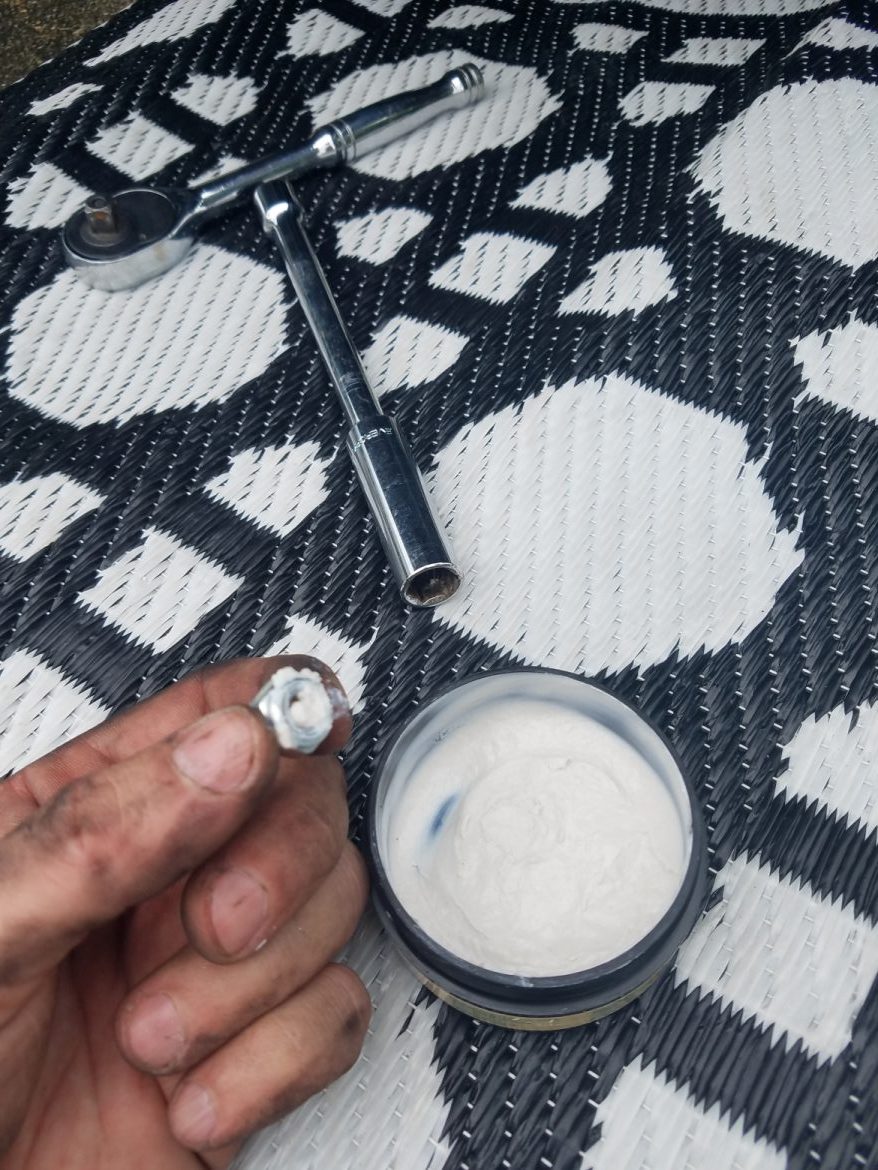
Once the vehicle is jacked up enough to allow clearance for the new SumoSpring, enter at an angle from the back side towards the rear and finesse the stud up through the hole. Then, once the SumoSpring is in the hole put a dollop of grease or something sticky (I used hair clay) in the socket to hold the new nut in place, while hand tightening (so you don’t cross the threads) the new nut in place on the SumoSpring. The grease will help so the nut doesn’t fall into the hole and give you another 20-minute headache messing around with it.
Once it’s hand tightened put the socket and extension back on the racket and hold the SumoSpring in one hand to prevent spinning and ratchet the nut down until the whole SumoSpring starts to turn. Make sure the SumoSpring is flat and installed properly before lowering the vehicle. Once this happens lower the vehicle back down completely and finish tightening. That’s it!


Step 5 – Repeat Steps 1 Through 4 on the Other Side
Rear SumoSprings Installation Steps

Ok, the fronts weren’t that bad were they? Well….. I wish I could give the rears a 1 on the old difficulty scale too, but I can’t. Because it was difficult. Why….. because if you don’t a have a 20,000 lb heavy-duty automotive lift, you will be doing this one on your back, under a big vehicle. If your like me, you don’t like working underneath big heavy vehicles. Also, working on a motor home you have all types of systems in the way that make it just a little tighter to work. If you’re also working on an Airstream Interstate you have the macerator, reel hose box, the propane tank and grey tank that are interfering with rear jacking points. But, that won’t stop the persistent.
I would rate this a difficulty of a 6, mainly because of the tight working conditions, working on your back under the vehicle and the difficulty of getting the new SumoSprings into the original bracket. Keep reading for my tips and experience on installing these rear SumoSprings. FYI, it took me about 4 hours to complete with 80% of that on the first side. In other words, once you know how to do it…… it’s not that bad.
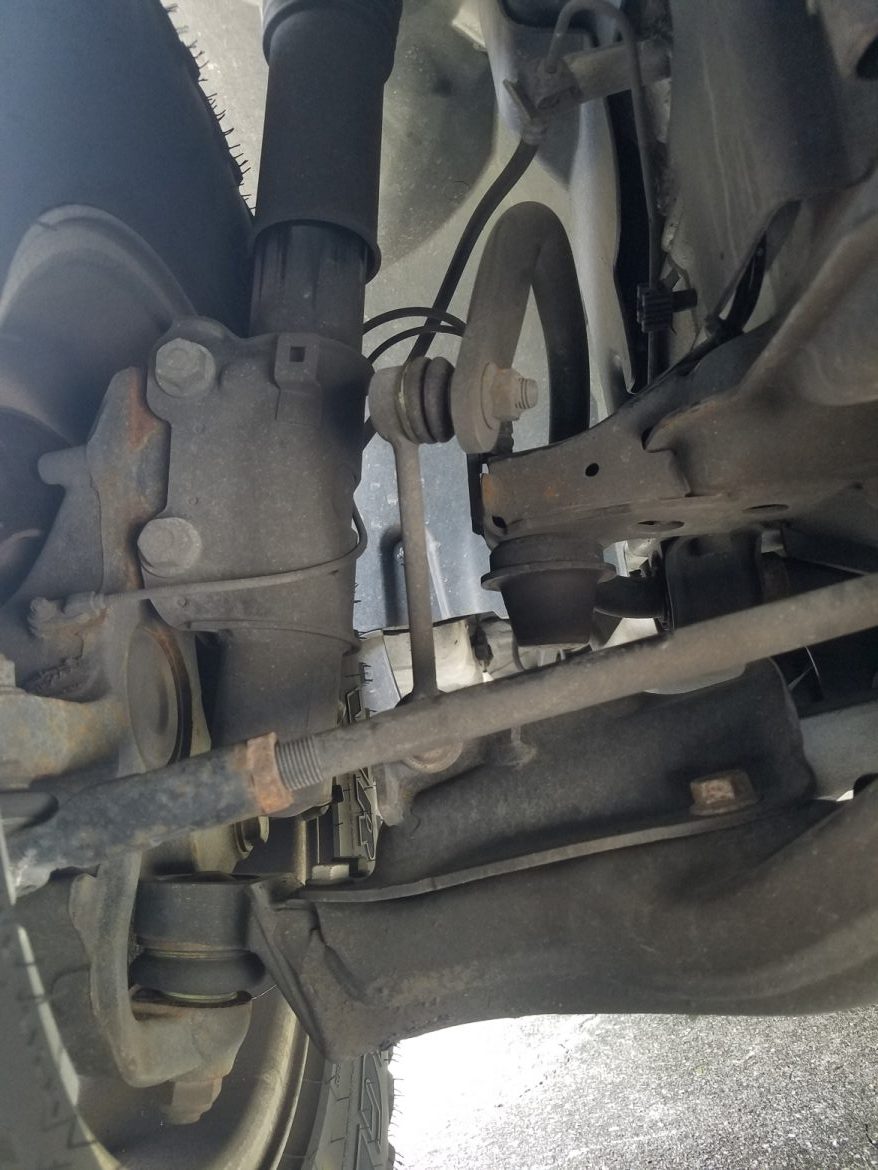
Step 1 – Locate Rear Jacking Point
Again, make sure you check your owner’s manual for your exact make and model lifting point, because every one is different. On my 2014 Airstream Interstate Sprinter the rear lifting points are on the front leaf spring bracket in front of the rear axle. The passenger side is located in front of the rear tires about a foot under the van between the grey tank and exhaust pipe. My driver side was squeezed in between the propane tank and macerator hose box. Watch out for these outfitter add-ons like tanks, wires, brackets, or any other after market things that could be in the way. It was a very tight squeeze for me to find these lifting points.


Step 2 – Lift Rear Suspension
A big chunk of the time is just finding a safe and proper lifting point. Like I said, I don’t like working underneath big heavy vehicles! For the rears you need to do the majority of the work on your back underneath the vehicle. So that makes the rears a MUCH more difficult job than the front. You should never work under the vehicle with just the jack only. It is always recommended to use jack stands. For me, I’m thin enough to slide under the vehicle without lifting it, but need to raise the suspension a couple of inches to make room for the new SumoSpring. Note: the rear tires DO NOT need to be lifted off of the ground.
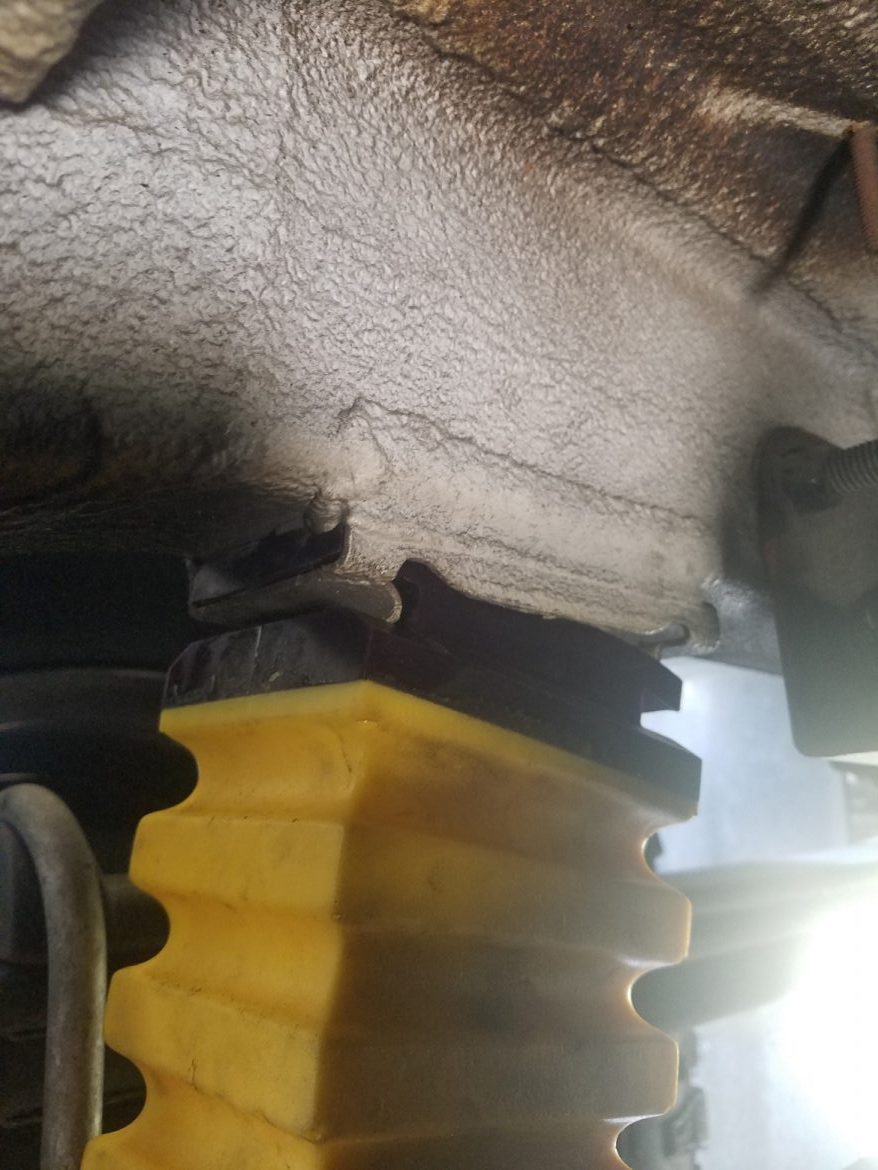
Step 3 – Remove OEM Bump Stop
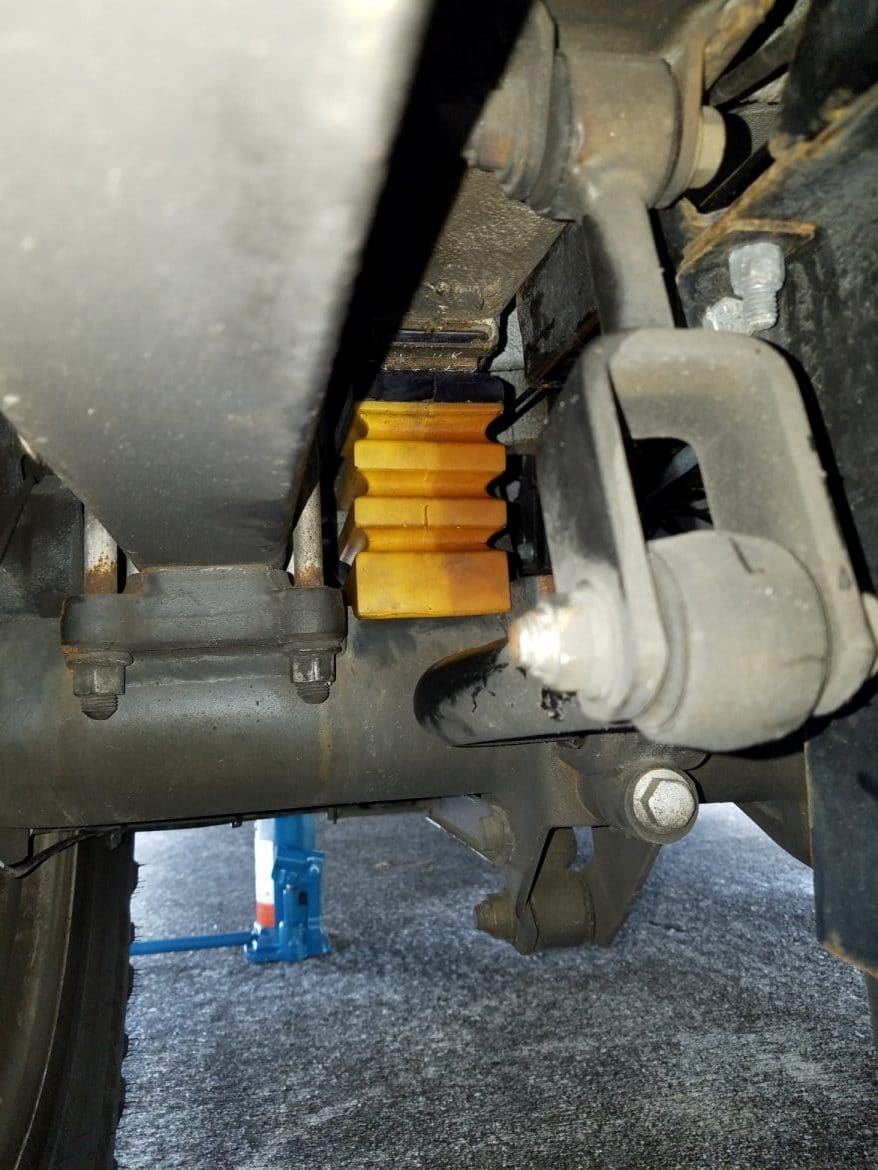
Locate rear OEM bump stop directly above the rear axle closest to the inside of the tire. Lying on your back facing the rear of the vehicle, cup the underside of the mount and pull towards front of vehicle and it should pop right out. Very easy. Once the rear OEM mount is out you can make sure there is enough clearance for the larger SumoSpring to fit between the axle.

Step 4 – Install New SumoSpring
Locate the deeper notch and insert that side first into the bracket side that is closest to the front of the vehicle. Make sure it is fully seated into the bracket. Now comes the difficult part. Trying to get the rear portion of the sumo spring into the rear of the bracket. Here is the tip that may save you hours of wrestling with this mount that I didn’t discover until I started to put the other rear SumoSpring in. It dawned on me that the mounts are very stiff when new and because I fought with it for about two hours it softened up enough to squeeze into the mount bracket. This combined with the correct leverage point made the second one take about 15 minutes to get in.


The Tip – Take the new mount and roll back and forth for about 5 minutes to soften the lips enough that they bend into the bracket much easier. Also, lube the smaller lip of the mount to help it slide in.
The Technique – I struggled with the first one for a couple of hours just not finding the right angle or the right leverage point. Also, not having a garage full of tools is a big hinderance from what could be a quick and easy job. But, never give up, and you will prevail! Once I got the correct leverage point and technique, it popped in less than five minutes.
That technique for me was pressing straight up from the bottom of the SumoSpring while at an angle with my left hand and jamming/wedging the top of the sumo spring into the rear bracket with a flathead screw driver. I also used a little bit of coconut oil around the lip to help squeeze it in.
There is probably more than one way to do this with the correct tools. Perhaps with a large flat pry bar and a large flat screwdriver prying and wedging at the same time. Once the rear bracket pops in make sure it is fully seated in the bracket and centered over the axle. Then when everything is safely out of the way lower the vehicle suspension back down. Take one more look once its down to ensure everything looks correct and it is seated flush with the rear axle into the rounded notch of the sumo spring.

Step 5 – Repeat Steps 1 Through 4 on the Other Side
SumoSprings Review
2014 Airstream Interstate on 2013 Mercedes Sprinter 3500
There are plenty of reviews out there on the internet that give these things positive reviews. Many people have said that SumoSprings are a necessary upgrade for anyone with a motor home. I agree. That is why I had a set of SumoSprings picked out before we even bought our van. I’m going to break this review into three categories. The Good, The Bad, and FAQ’s. I’m just making up the questions based off some of the questions I had or have seen out there. If you have any you don’t see leave them in the comments and I will do my best to answer them!
The Good
Ride Improvement
You will notice an immediate improvement in almost all aspects of ride control. With so much weight in these motor homes and with the tall roofs they need every bit of support to help with sway, roll, turning, and bumps.
Price
At around $200 per set these are a relatively low financial investment for the DIY’er. The ROI is even greater because of all the areas of ride control that get improved for that little investment.
Install Skill
The install skill needed for the fronts is very minimal. Almost any DYI’er can do it easily. The rear’s are quite a bit harder than the fronts but are still very doable for most with a little skill and an afternoon to spare.
The Bad
I don’t think there are very many negative aspects of putting SumoSprings in. But, here are a couple of things to keep in mind. If you don’t put them in yourself you could be looking at about $1000 total(product and install)for front and rear. If you are heavily loaded you will still need to drive slowly over steep driveway dips and turning scenarios. Ride comfort is very subjective, but generally speaking the SumoSprings will give you a stiffer ride, which in turn gives the better handling.
SumoSprings I used SumoSprings Medium and Light Options
Fronts SSF-106-47 Rears SSR-338-54 Rear Medium Front Light
FAQ’s
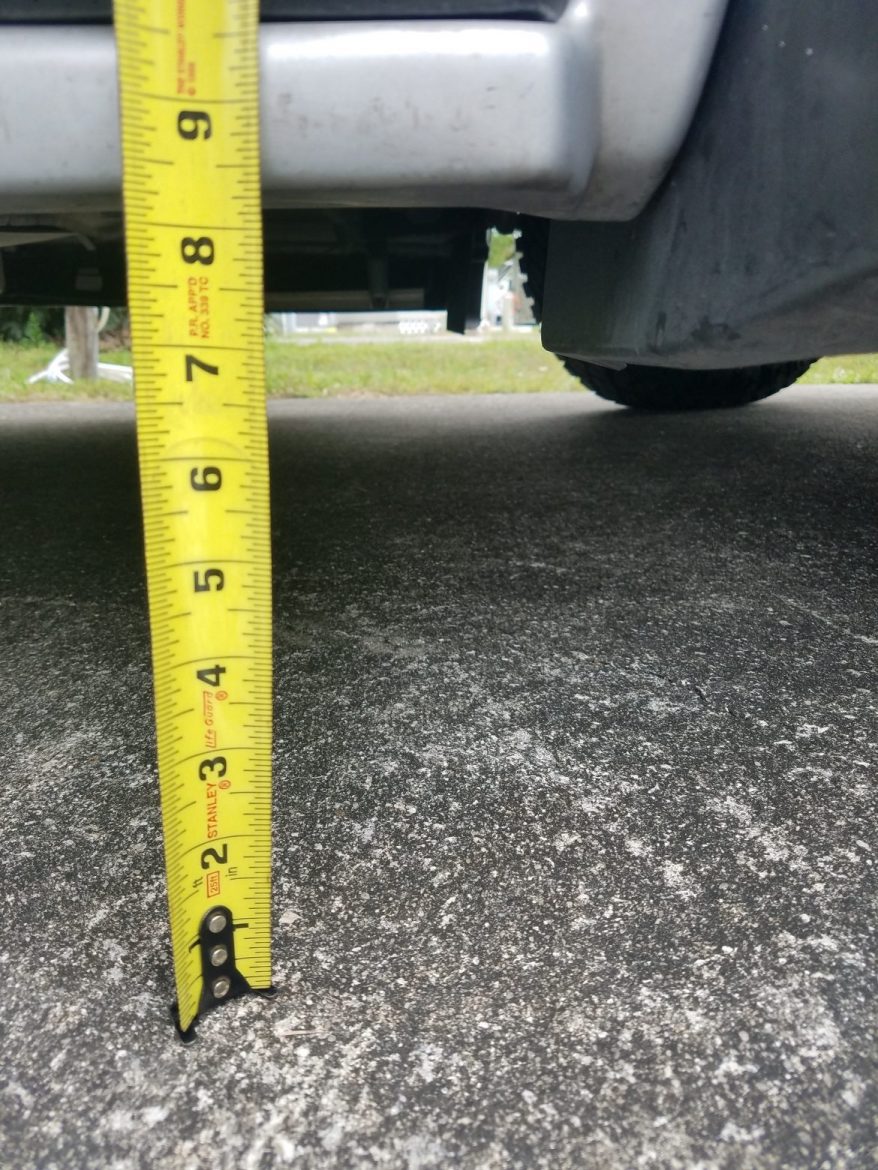
Yes. But that will very quite a bit. My 2013 Sprinter 3500 raised about .75 of an inch in the front and about .50 in the rear.
Other’s have reported around 1 inch. 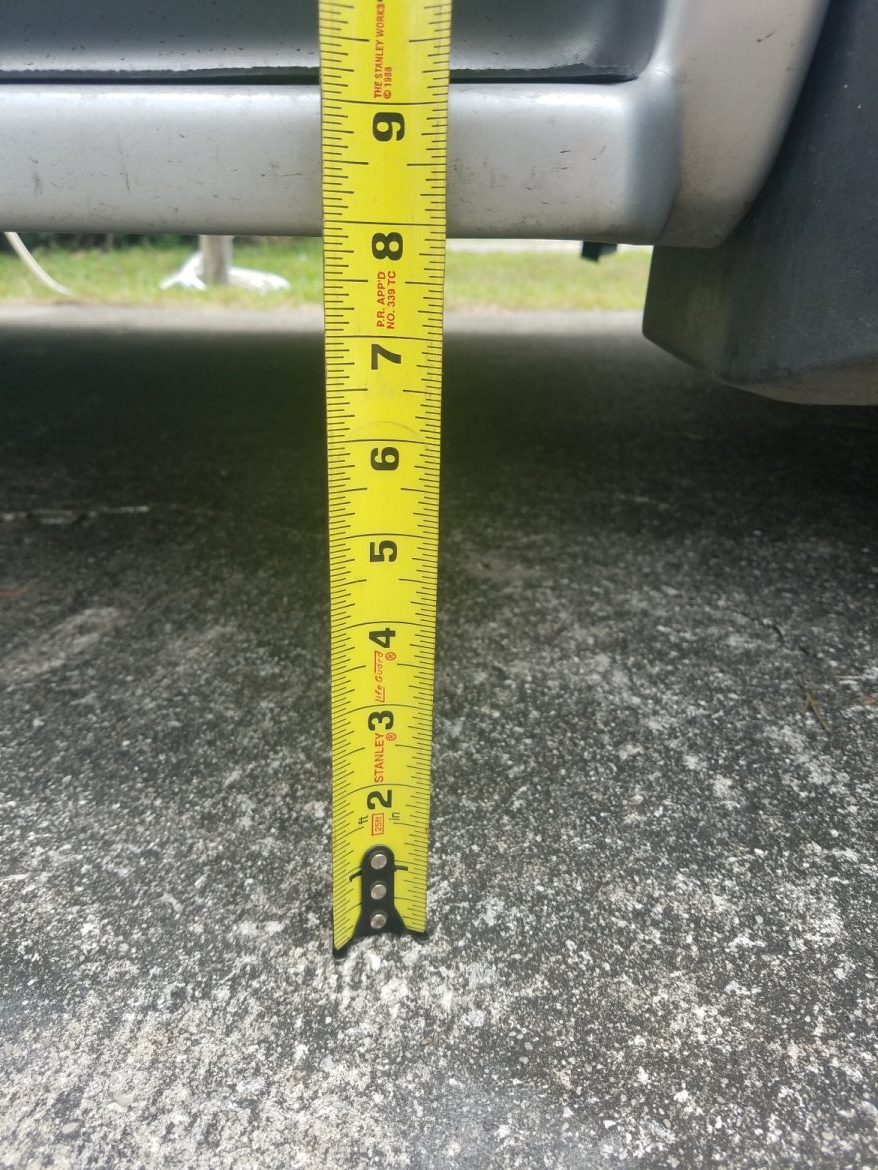
The quotes I received were around $150 to $250 per pair to install. Camping World had the best price I received.
For the average DIY’er they are a project that can be accomplished in an afternoon. I rate the fronts on a Sprinter as very easy and the rears as a medium difficulty level.
Yes. The new Sumosprings are larger than the OEM bump stops, they usually take up the slack of the suspension and create less body roll.
I think they totally are. The majority of reviews on the internet are also very positive. When dealing with personal preferences on ride control it can be very subjective!
My opinion is to go with Yellow (-54 most dense) if you have a commercial, heavy-duty, or motor home application that is usually carrying a heavy load. If you have a lighter duty application you can go with black (-47 medium density) or there blue (-40 lightest density). I have read a few reviews with RVers going too light and not liking it.
What are SumoSprings?
According to SumoSprings website, this is the definition they give. “SumoSprings® are a patented suspension product designed to enhance load carrying ability, stabilize sway, and improve overall driver control and ride comfort. They are maintenance free, do not leak air, and do not require airlines or compressors. SumoSprings® are manufactured in a variety of heights, diameters and densities to support multiple front and rear applications. They are manufactured from proprietary closed micro-cellular urethane providing a smooth and progressive spring rate.”
They have a lot of good information on their site also. Check it out for specific year, make, model info. SumoSprings
You can search Amazon below for your rig. Thanks!

Hahaha…the hair gel joke was brilliant, it made me laugh :-))) thank you very much for taking the time and the effort out in writing this excellent tutorial. I wish there were more people like you about. Blessings.